Week-2
Unleashing the Power of Containerization for Seamless Application Deployment and Management

Table of Contents:
Introduction
What Are Containers?
What Is Docker Used For?
Docker Desktop
Docker Advantages
Docker Disadvantages
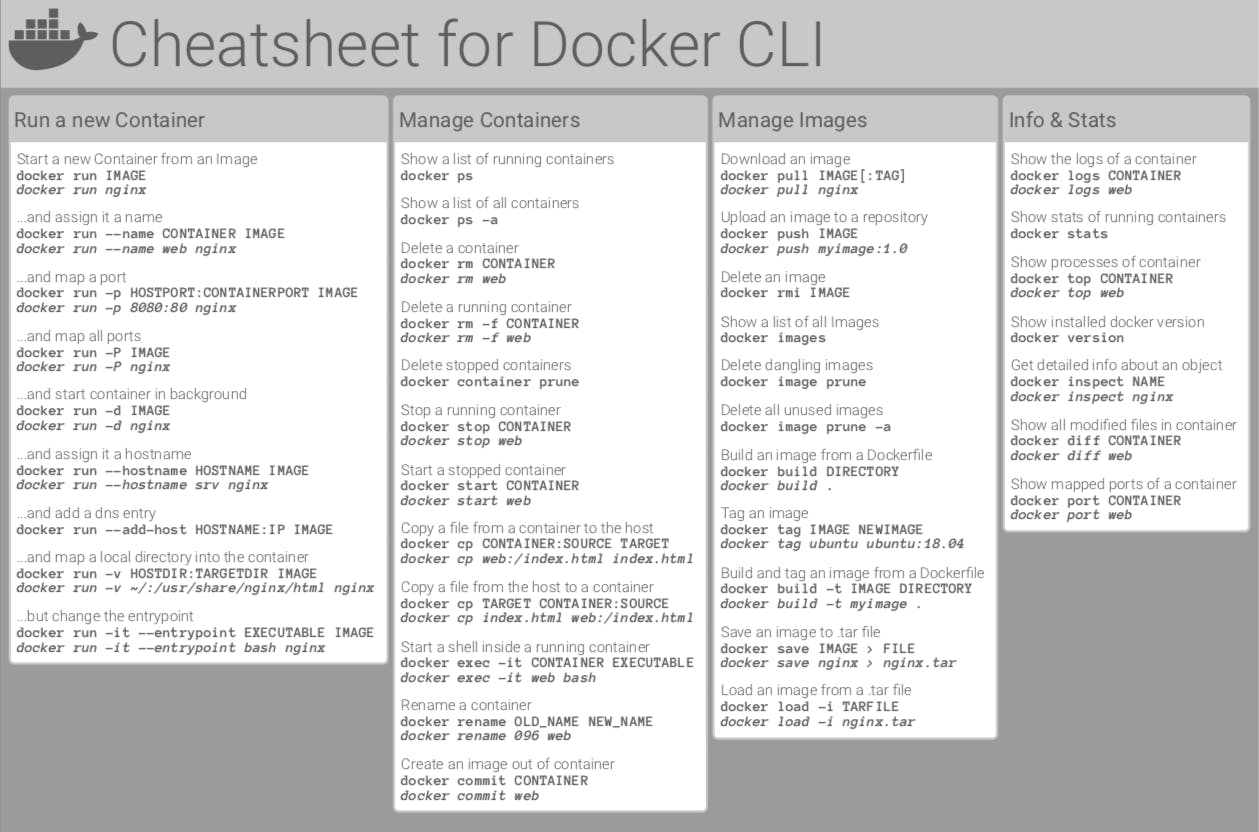
The Ultimate Docker Cheat Sheet
Conclusion
Introduction:
Docker is an open-source platform that provides an efficient and lightweight way to build, package, and distribute applications as containers. Containers are isolated, lightweight environments that encapsulate an application along with its dependencies, libraries, and configuration files. These containers can run consistently across different environments, making it easier to deploy and manage applications.
What Are Containers?
Docker containers: Docker containers are lightweight, virtualized runtime environments designed for running applications. Each container is a self-contained package that includes the necessary code, system tools, runtime, libraries, dependencies, and configuration files for a specific application.
Independence and isolation: Containers are independent and isolated from the host system and other containers running on the same host. This means that changes or issues in one container do not affect others, providing a secure and reliable environment for application deployment.
Docker images: Docker images serve as the basis for creating containers. An image is a read-only template TABLE OF CONTENTS What is CI/CD? What Is a Build Job? What is Freestyle Projects ?? 🤔 Task-01 Task-02 What is CI/CD? CI or Continuous Integration is the practice of automating the integration of code changes from multiple developers into a single codebase. It is a software development practice where the developers commit their work frequently to the central code repository (Github or Stash). Then there are automated tools that build the newly committed code and do a code review, etc as required upon integration. The key goals of Continuous Integration are to find and address bugs quicker, make the process of integrating code across a team of developers easier, improve software quality, and reduce the time it takes to release new feature updates.
CD or Continuous Delivery is carried out after Continuous Integration to make sure that we can release new changes to our customers quickly in an error-free way. This includes running integration and regression tests in the staging area (similar to the production environment) so that the final release is not broken in production. It ensures to automate the release process so that we have a release-ready product at all times and we can deploy our application at any point in time.
What Is a Build Job? A Jenkins build job contains the configuration for automating a specific task or step in the application building process. These tasks include gathering dependencies, compiling, archiving, or transforming code, and testing and deploying code in different environments.
Jenkins supports several types of build jobs, such as freestyle projects, pipelines, multi-configuration projects, folders, multibranch pipelines, and organization folders.
What is Freestyle Projects ?? 🤔 A freestyle project in Jenkins is a type of project that allows you to build, test, and deploy software using a variety of different options and configurations. Here are a few tasks that you could complete when working with a freestyle project in Jenkins:that contains all the necessary components and instructions to run a particular application.
Building containers: To create a container, you run an image on the Docker Engine. This process sets up an isolated instance of the application with its own runtime environment, file system, and network configuration.
Understanding the difference: It's important to grasp the distinction between Docker images and Docker containers. An image is a static snapshot that serves as a blueprint for creating containers. Containers, on the other hand, are the active instances of those images running in a live environment.
Resource efficiency: Docker containers operate at the application level, rather than virtualizing an entire operating system like virtual machines do. As a result, containers share the underlying OS kernel with the host system, making them lightweight and resource-efficient. This allows for running multiple containers on the same hardware, optimizing resource utilization.
Quick and easy configuration: Docker containers offer a streamlined and rapid configuration process. Since containers utilize the host system's kernel, they require fewer resources and can be set up and configured quickly. This agility makes it easier to deploy and manage applications.
In summary, Docker containers provide lightweight, isolated runtime environments for running applications. They are based on Docker images and offer independence, isolation, resource efficiency, and quick configuration. By leveraging containers, developers and system administrators can simplify application deployment and management, optimizing resource utilization and ensuring consistency across different environments.

What Is Docker Used For?
Docker is used for:
Develop applications that work on any OS
Easy to share applications among teams
Easy to scale across multiple servers
Large applications can be broken into multiple containers - one for each microservice
A great solution for Cloud Computing
Big community and library of Docker Images
A cost-effective alternative to virtual machines.
A version control system for an application.
Docker Desktop
Docker Desktop, formerly known as Docker for Windows and Docker for Mac, is an application that allows you to start creating and running containers on Windows and Mac within minutes. It is a simple way of installing and setting up the entire Docker development environment. It includes Docker Engine, Docker Compose, Docker CLI client, Docker Content Trust, Kubernetes, and Credential Helper.
The tool is used for building and sharing containerized applications and microservices in multiple languages and frameworks, on any cloud platform.
To learn more, check out Docker's official documentation on Docker Desktop.
Docker Advantages
Consistency. Docker ensures reliability that your app runs the same across multiple environments. Developers working on different machines and operating systems can work together on the same application without environmental issues.
Automation. The platform allows you to automate tedious, repetitive tasks and schedule jobs without manual intervention.
Faster deployments. Since containers virtualize the OS, there is no boot time when starting up container instances. Therefore, you can do deployments in a matter of seconds. Additionally, you can share existing containers to create new applications.
Support of CI/CD. Docker works well with CI/CD practices as it speeds up deployments, simplifies updates, and allows teammates to work efficiently together.
Rollbacks and image version control. A container is based on a Docker image which can have multiple layers, each representing changes and updates on the base. Not only does this feature speed up the build process, but it also provides version control over the container. This allows developers to roll back to a previous version if the need arises.
Modularity. Containers are independent and isolated virtual environments. In a multi-container application, each container has a specific function. By segregating the app, developers can easily work on a particular part without taking down the entire app.
Resource and cost-efficiency. As containers do not include guest operating systems, they are much lighter and smaller than VMs. They take up less memory and reuse components thanks to data volumes and images. Also, containers don't require large physical servers as they can run entirely on the cloud.
Docker Disadvantages
No graphical interface. Docker is not the best choice if you want to run apps that require a graphical interface. It is mainly for hosting applications that run on the command line.
Security issues. Although Docker provides security by isolating contains from the host and each other, there are certain Docker-specific security risks. Many potential security issues may arise while working with containers, so make sure to adopt the best Docker security practices that can help you prevent attacks and privilege breaches.
Learning curve. Even developers experienced with the VM infrastructure need some time to get used to Docker concepts and how they work. If switching to Docker, make sure to take into account the necessary learning curve.
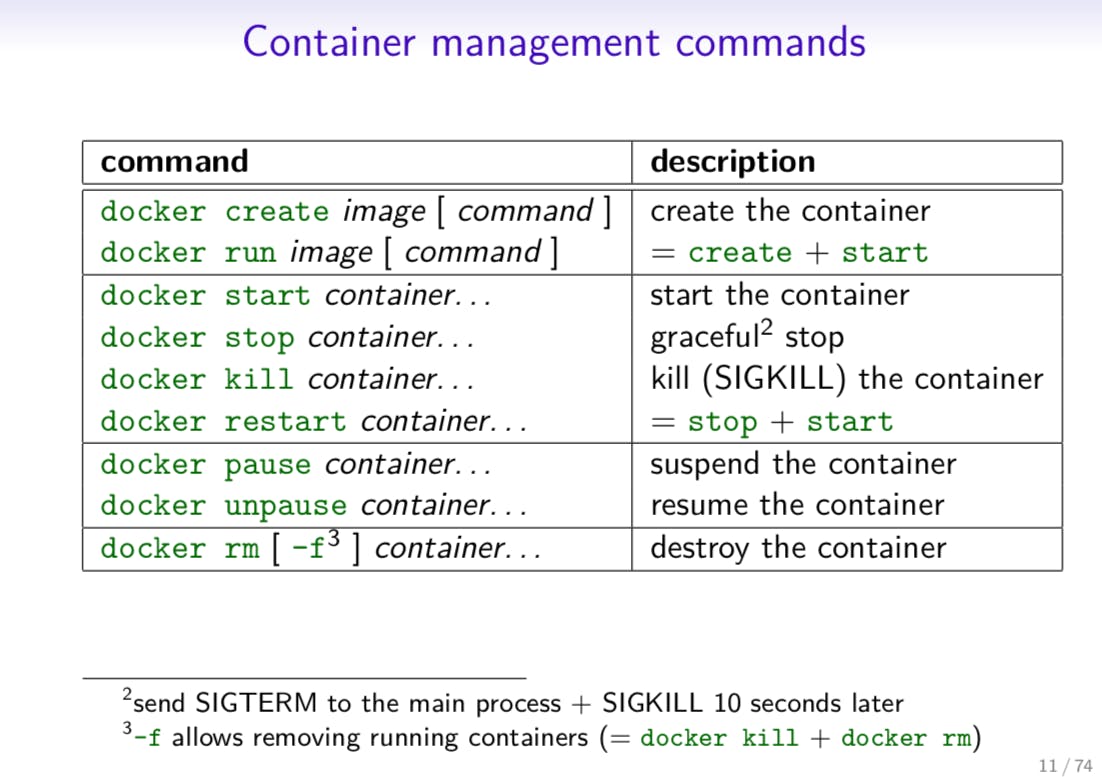
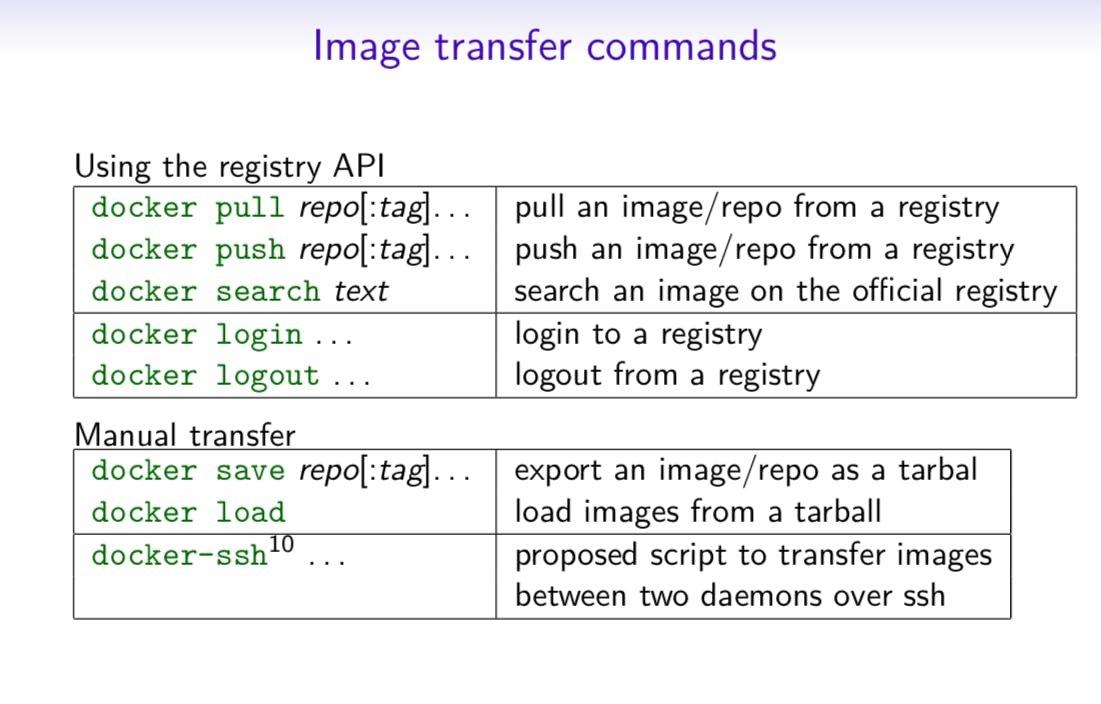
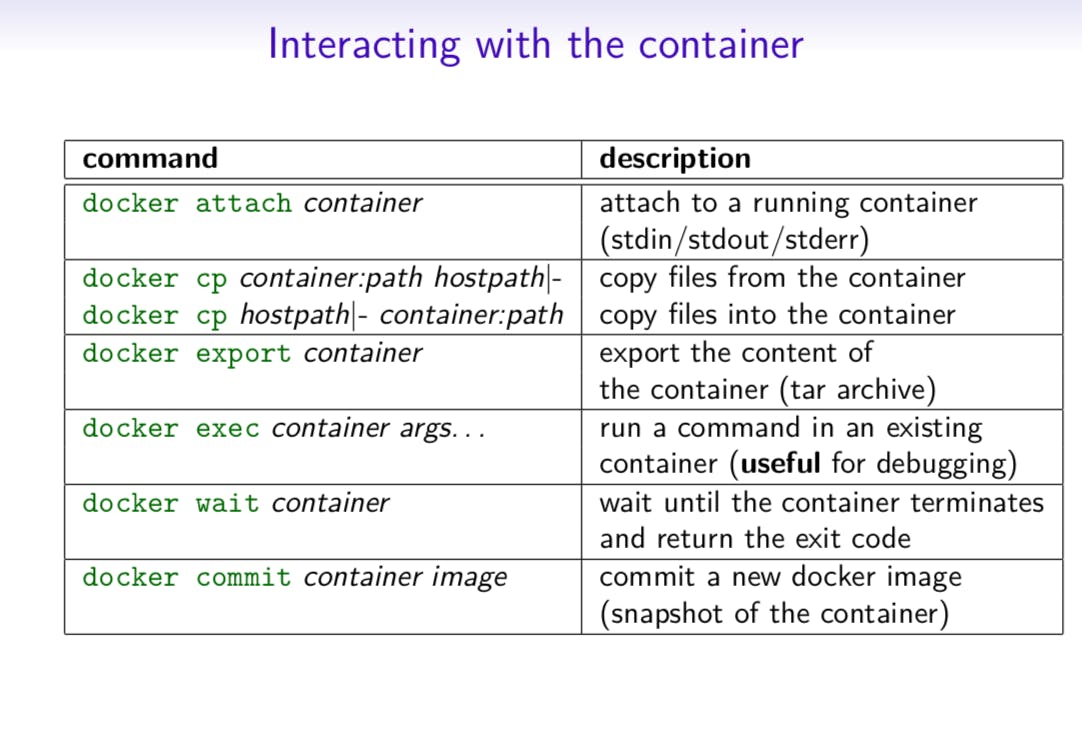
The Ultimate Docker Cheat Sheet
Conclusion
In this article, you learned all about Docker, why it is useful in software development, and how you can start using it. Make the most of Docker's advantages and utilize this powerful containerization platform.
Dockerfile, Docker-Compose, Swarm and Volumes
TABLE OF CONTENTS
If You Want to dive into the world of containerization and explore the basics of what containers are and how they are used. We also take a closer look at Docker and its many uses, including Docker Desktop and the advantages and disadvantages of using this powerful tool. To supplement your understanding, we have also included the Ultimate Docker Cheat Sheet, which serves as a quick reference guide for all your containerization needs. For more in-depth information on the topic, be sure to check out my previous blog post here.
Dockerfile
Docker is a tool that makes it easy to run applications in containers. Containers are like small packages that hold everything an application needs to run. To create these containers, developers use something called a Dockerfile.
A Dockerfile is like a set of instructions for making a container. It tells Docker what base image to use, what commands to run, and what files to include. For example, if you were making a container for a website, the Dockerfile might tell Docker to use an official web server image, copy the files for your website into the container, and start the web server when the container starts.
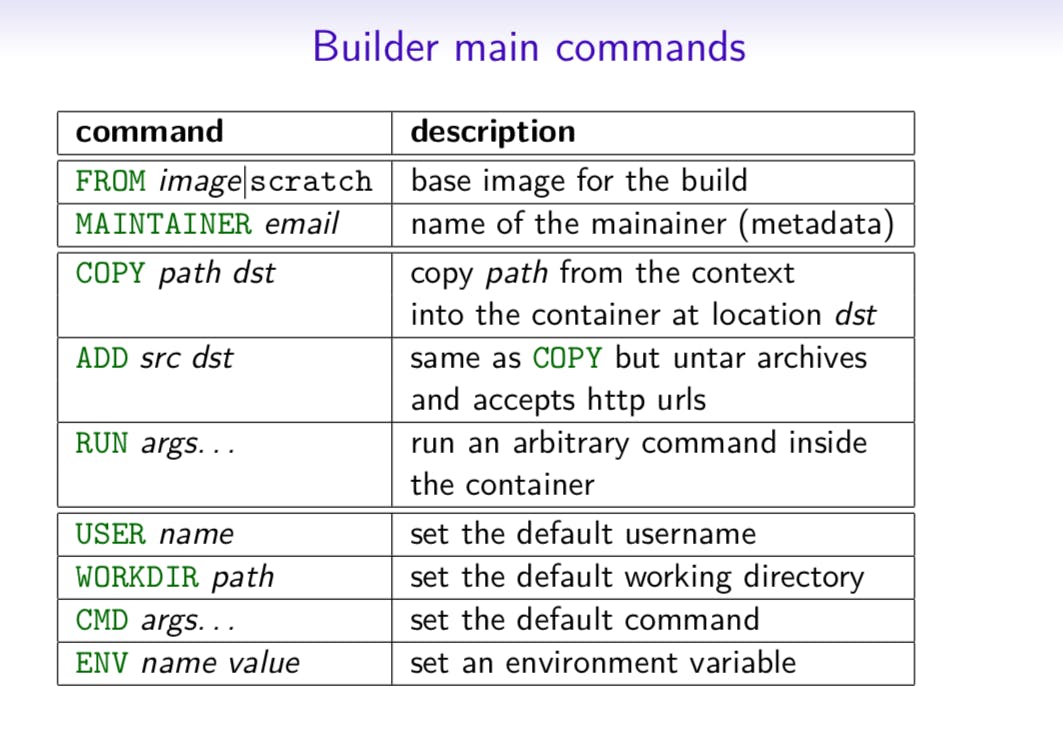
Here are some of the most commonly used commands in a Dockerfile:
FROM: Specifies the base image that the new image will be built on top of. For example, you might use an official Node.js image as the base for an application that runs on Node.js.RUN: Executes a command in the image. This command is run during the image build process. For example, you might use theRUNcommand to install necessary packages or dependencies for your application.COPY: Copies files from the host machine to the image. For example, you might use theCOPYcommand to copy the files for your application into the image.ENV: Sets an environment variable in the image. For example, you might use theENVcommand to set a variable that holds the version of your application.EXPOSE: Specifies the ports that should be exposed on the container. For example, you might use theEXPOSEcommand to specify that port 8000 should be exposed on the container.CMD: Specifies the command that should be run when a container is created from the image. For example, you might use theCMDcommand to specify that your application should be started when the container is created.Examples
Once the image is created from the Dockerfile, you can use it to create as many containers as you want. Each container will be exactly the same and will run the same way.
Docker-Compose
Docker Compose is a tool that makes it easy to run multiple containers at once. It allows you to define all the containers, networks, and volumes for your application in a single file. This file is called a "docker-compose.yml" file.
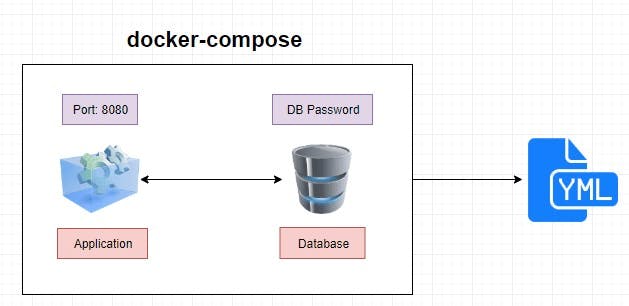
Imagine you have a web application that consists of a web server, a database, and a cache. Each of these parts is run in its own container. To run all these containers individually, you would have to run several commands, and it would be hard to keep track of them all. With Docker Compose, you can define all the containers and their configurations in a single file.
The docker-compose.yml file is like a recipe for your application. It tells Docker Compose which images to use, which ports to expose, and how to link the containers together. It's similar to a recipe you would use to cook a meal. You have a list of ingredients, and instructions on how to prepare and serve them.
To start these services, you would use the command docker-compose up, and to stop them, you would use the command docker-compose down.
Docker Compose is a powerful tool that makes it easy to run multiple containers at once, and it allows you to define all the containers, networks, and volumes for your application in a single file. With this tool, you can describe your entire application in a single file, making it easy to manage and deploy your application.
In simple words, Docker Compose is a tool that makes it simple to run multiple containers together, by using one file to describe all the containers that make up an application. It's like a set of instructions that tell Docker how to run your application, similar to a recipe that tells you how to cook a meal.
Benefits of Docker Compose
● Single host deployment - This means you can run everything on a single piece of hardware
● Quick and easy configuration - Due to YAML scripts
● High productivity - Docker Compose reduces the time it takes to perform tasks
● Security - All the containers are isolated from each other, reducing the threat landscape
Docker-Volume
Docker also allows you to create something called volumes. Volumes are like separate storage areas that can be accessed by containers. They allow you to store data, like a database, outside the container, so it doesn't get deleted when the container is deleted.
When we run a container, it has its own storage space that is only accessible by that specific container. If we want to share that storage space with other containers, we can't do that.
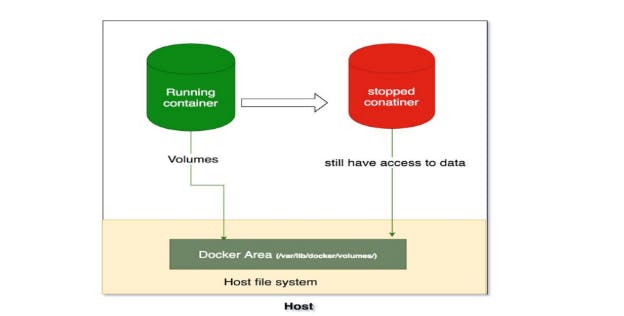
Docker Volumes are a solution to this problem. Volumes are like extra storage spaces that can be used by multiple containers at the same time. They are stored separately from the containers and can survive even if the container is stopped. This means that even if a container is shut down, the data stored in the volume can still be accessed by other containers.
Think of it like having a shared drive on your computer where multiple people can access the same files. The shared drive is separate from each person's individual storage space and the files stored there can be accessed even if one of the users logs off.
In short, Docker Volumes is a way to share storage between different containers, making it easy to share data and store persistent information that needs to survive even if the container is stopped.
To create a volume, you use the docker volume create a command followed by the name of the volume. For example, to create a volume named app_1_volume, you would use this command:
COPY
COPY
docker volume create app_1_volume
To connect a container to a volume, you use the -v flag when running the container. For example, to connect a container named mycontainer to the data volume, you would use this command:
COPY
COPY
docker run -v data:/data -it --name mycontainer myimage
This connects the data volume to the /data directory in the container, allowing the container to access the data stored in the volume.
In simple terms, a Dockerfile is a set of instructions for making a container, and volumes are like separate storage areas that can be accessed by containers. Developers use Dockerfiles to create images, and use those images to create containers that run applications. Volumes are used to store data outside the container, so it doesn't get deleted when the container is deleted.
Docker Swarm
Docker Swarm is a tool that allows you to easily manage and organize multiple containers, which are small packages that hold all the necessary files for a specific application to run. The way it works is by dividing the management of the containers into two parts: manager nodes and worker nodes.
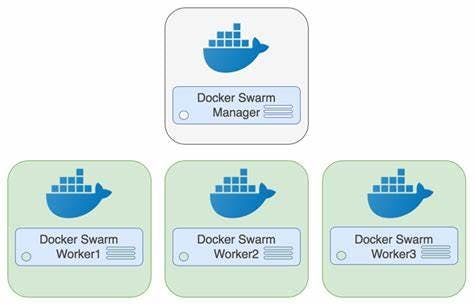
Manager nodes are responsible for making sure everything runs smoothly and that the desired state of the containers is achieved. They do this by using a special algorithm that allows them to communicate with each other and make sure that everything is running as it should.
Worker nodes, on the other hand, are responsible for actually running the containers. They communicate with the manager nodes to receive instructions on what to do and report back on the status of the containers.
Think of it like a construction project. The manager nodes would be the project managers, who make sure everything runs smoothly and is on schedule and budget. While the worker nodes would be the construction workers, who do the actual work of building the structure.
In simple terms, Docker Swarm is a tool that allows you to easily manage and organize multiple containers by dividing the management into two parts, manager nodes and worker nodes, where manager nodes make sure everything runs smoothly and worker nodes run the containers.
To start using Docker Swarm, you first create a "Swarm" which is like a group of connected computers (or "nodes") that work together. Then, you can add more computers to this group as needed. Once your Swarm is set up, you can then create "services" which are like individual applications that run inside containers.
For example, let's say you have a website that displays a list of products. To run this website, you would create a service that runs an nginx container (a type of container that helps display web pages) and maps port 80 (the default port for web pages) on the host to port 80 in the container.
COPY
COPY
docker service create --name my-web --replicas 3 --network mynetwork -p 80:80 nginx
This command creates a service named my-web, with 3 copies running on the mynetwork network and mapping port 80 on the host to port 80 in the container.
You can also use the docker service ls command to view the services running on the Swarm and the docker service scale command to increase or decrease the number of copies of a service. For example, if you wanted to increase the number of copies for the my-web service to 5, you would use the following command:
COPY
COPY
docker service scale my-web=5
Docker Swarm also allows for rolling updates of services. This means that you can update the image or configuration of a service without any down-time. You can use the docker service update command to perform a rolling update on a service.
In simple terms, Docker Swarm allows you to easily manage and organize multiple applications running in containers, and handle changes or updates without any down-time. It's like hiring a manager for your group of connected computers, so you can focus on running your applications.
The advantages of Docker Swarm Architecture are:
Easily manageable by using the swarm command
Only one point of access is needed to build a whole swarm
Simple and easy to understand compared to other orchestration tools like Kubernetes
High availability, so if the master fails, another worker node takes over
The manager keeps track of the cluster's state to maintain consistency between the actual and desired state.
It's a versatile tool that can be used for various tasks and is easy to set up and manage.
Docker Network
Docker allows you to create virtual spaces called networks, where you can connect multiple containers (small packages that hold all the necessary files for a specific application to run) together. This way, the containers can communicate with each other and with the host machine (the computer on which the Docker is installed).
There are three types of networks that can be created in Docker:
Bridge network: This is the default network that is created when Docker is installed. Containers connected to a bridge network can talk to each other and to the host machine, but not to other networks. To create a new bridge network, you can use the
docker network createcommand. For example, to create a new bridge network namedCustomNetwork, you would use the following command:COPY
COPY
docker network create --driver bridge CustomNetworkHost network: Containers connected to a host network have direct access to the host machine's network interfaces and ports. This type of network is useful for situations where a container needs to bind to a specific port on the host machine. To create a new host network, you can use the
docker network createcommand with the--driver hostoption. For example, to create a new host network namedCustomNetwork, you would use the following command:COPY
COPY
docker network create --driver host CustomNetworkOverlay network: Overlay networks allow you to create multi-host networks, which means that containers can communicate across multiple host machines. This type of network is useful for situations where a container needs to communicate with other containers that are running on different host machines. To create a new overlay network, you can use the
docker network createcommand with the--driver overlayoption. For example, to create a new overlay network namedCustomNetwork, you would use the following command:COPY
COPY
docker network create --driver overlay CustomNetwork
To create a new network, you can use the docker network create command. For example, to create a new network named mynetwork you would use the following command:
COPY
COPY
docker network create mynetwork
Once the network is created, you can use the docker network connect command to connect a container to the network. For example, to connect a container named mycontainer to the mynetwork network, you would use the following command:
COPY
COPY
docker network connect mynetwork mycontainer
In simple terms, Docker networks allow you to connect multiple containers together and make them communicate with each other and the host machine. There are different types of networks that can be created depending on the needs, and you can use the docker network create and docker network connect commands to create and connect containers to the network respectively.
conclusion
In conclusion, Docker Swarm is a simple and easy-to-use orchestration tool that can handle a variety of tasks. It is suitable for small to medium-sized deployments, and is easy to set up and manage. However, if you are looking for a more feature-rich and complex solution with more scalability options, then Kubernetes might be a better fit. Ultimately, the choice between the two depends on the specific needs and requirements of your project and organization.
Jenkins Freestyle Project for DevOps Engineers:
TABLE OF CONTENTS
What is CI/CD?
CI or Continuous Integration is the practice of automating the integration of code changes from multiple developers into a single codebase. It is a software development practice where the developers commit their work frequently to the central code repository (Github or Stash). Then there are automated tools that build the newly committed code and do a code review, etc as required upon integration. The key goals of Continuous Integration are to find and address bugs quicker, make the process of integrating code across a team of developers easier, improve software quality, and reduce the time it takes to release new feature updates.
CD or Continuous Delivery is carried out after Continuous Integration to make sure that we can release new changes to our customers quickly in an error-free way. This includes running integration and regression tests in the staging area (similar to the production environment) so that the final release is not broken in production. It ensures to automate the release process so that we have a release-ready product at all times and we can deploy our application at any point in time.
What Is a Build Job?
A Jenkins build job contains the configuration for automating a specific task or step in the application building process. These tasks include gathering dependencies, compiling, archiving, or transforming code, and testing and deploying code in different environments.
Jenkins supports several types of build jobs, such as freestyle projects, pipelines, multi-configuration projects, folders, multibranch pipelines, and organization folders.
What is Freestyle Projects ?? 🤔
A freestyle project in Jenkins is a type of project that allows you to build, test, and deploy software using a variety of different options and configurations. Here are a few tasks that you could complete when working with a freestyle project in Jenkins:
Task-01
- create an agent for your app. ( which you deployed from docker in the earlier task)
  sudo apt-get update
  sudo apt-get install docker.io -y
  sudo usermod -a -G docker jenkins
  sudo reboot
Create a new Jenkins freestyle project for your app.

In the "Build" section of the project, add a build step to run the "docker build" command to build the image for the container.

Add a second step to run the "docker run" command to start a container using the image created in step 3.


Task-02
- Create Jenkins project to run the "docker-compose up -d" command to start the multiple containers defined in the compose file.
sudo apt-get install docker-compose -y


Seting up Docker containers as build agent for Jenkins:

Building and Deploying a Node.js Application with Docker on Ubuntu Using Jenkins CI/CD Pipeline

The project aims to set up a Jenkins cluster consisting of a master node, an agent node, and a live server using three AWS EC2 instances. The project requires installing Java, Jenkins, and Docker on the master and agent nodes. The Jenkins cluster distributes the workload across multiple nodes, and the master node controls and assigns jobs to agent nodes. A pipeline is created to deploy a Node.js application using Docker. The pipeline has staged such as checkout, build, test, push, and deploy, which perform different tasks such as fetching source code from GitHub, building a Docker image, testing the image, pushing it to DockerHub, and deploying it to the live server. The project helps in automating the deployment process and saves time and effort by eliminating manual tasks.
Pre-Requisites:
1. 3 EC2 Instance ( 1 for Jenkins Master-Node, 1 for Jenkins Agent-Node, and 1 for Deploying live server)
2. Jenkins and Java Installation in Master-Node
3. Only Java Installation in Agent-Node
4. Docker Installation

Step 1: Set up a Jenkins Cluster (Master Node and Agent Node)
· Jenkins can be configured as a single server or as a cluster of servers, where the workload is distributed across multiple nodes.
· In a Jenkins cluster, multiple Jenkins instances, called nodes, work together to execute jobs. Each node has its own resources (such as CPU, memory, and disk space) and can perform builds independently.
· The Jenkins master controls the cluster and assigns jobs to the agent nodes based on their availability and workload.
· When a job is submitted to the Jenkins master, it decides which node to run the job on, based on the configured load balancing algorithm. The job is then executed on the selected node.


· Here I have successfully connected the agent node to the master node and its online.
Step 2: Create a Node-todo-app-deployment Job with Pipeline
· Go to Dashboard and click on New Item
· Enter an item name as “node-todo-app-deployment” and select pipeline as a job and click on OK.

· Give a job description
· Select the GitHub project and paste the GitHub project link
· Here, I used my GitHub project link
Selected GitHub hook trigger for GITscm polling for Build Triggers. To set up a Webhook trigger follow the steps:
· Go to the GitHub project link in that go to settings of the project.
· In settings, click on webhooks and click on add webhook
· In Payload URL — entre https://<public ip of masternode>:8080/github-webhook/
· In event you can select as your requirement.
· Click on Add Webhook

/In Pipeline definition, select pipeline script, and enter your Groovy code.
In a Jenkins pipeline, Groovy code is typically defined in a Jenkinsfile, which is a text file that contains the pipeline definition. The Jenkinsfile is written using the Groovy programming language and is used to define the stages, steps, and other elements of the pipeline.
There are many stages like Checkout, Build, Test, Push and Deploy
1. Checkout Stage
In a Jenkins pipeline, the “checkout” stage is used to fetch the source code from a version control system (VCS) such as Git, Subversion, or Mercurial.
In Pipeline, in the agent section, we have to mention our agent node name like the Dev-Agent node.
pipeline {
    agent { label 'Dev-Agent node' }

    stages{
        stage('Checkout'){
            steps{
                git url: 'https://github.com/patilprashant10/nodejs-todo-app.git', branch: 'master'
            }
        }
2. Build Stage
In a Jenkins pipeline, the “Build” stage is typically the first stage in the pipeline, and it is responsible for building the source code.
The “Build” stage can include any necessary steps to compile the code, package it into a deployable format, and perform any other necessary preparation tasks.
Here in this stage, I am building a docker image using docker file through command and tagging image with basanagoudapatil/nodo-todo-app-test:latest’
Note: Install docker and docker-compose in Jenkins Master-Node.
 stage('Build'){
            steps{
                sh 'sudo docker build . -t patilprashant10/nodo-todo-app-test:latest'
            }
        }
3. Test Stage
In a Jenkins pipeline, the “Test” stage is typically the second stage in the pipeline, and it is responsible for running tests to verify the correctness of the built code.
The “Test” stage can include any necessary steps to execute the tests and generate test reports.
Here in this stage, I am testing docker image by executing command
docker inspect — type=image basanagoudapatil/nodo-todo-app-test:latest
stage('Test image') {
            steps {
                echo 'testing...'
                sh 'sudo docker inspect --type=image patilprashant10/nodo-todo-app-test:latest '
            }
        }
4. Push Stage
In this stage, I am pushing docker image to my Dockerhub public repository and for dockerHub password I have generated separated dockerhub token.
 stage('Push'){
            steps{
                 sh "sudo docker login -u patilprashant10 -p dckr_pat_WSdI97yEEw0n90icDyZ4vlmEPqY"
                 sh 'sudo docker push patilprashant10/nodo-todo-app-test:latest'
            }
        }
5. Deploy Stage
In a Jenkins pipeline, the “Deploy” stage is typically the final stage in the pipeline, and it is responsible for deploying the built and tested artifacts to a target environment.
The “Deploy” stage can include any necessary steps to deploy the built artifacts to a target environment, such as a production server or a container registry.
Here in this stage, I am building docker-compose and deploying to another server using SSH command.
stage('Deploy'){
            steps{
                echo 'deploying on another server'
                sh 'sudo docker stop nodetodoapp || true'
                sh 'sudo docker rm nodetodoapp || true'
                sh 'sudo docker run -d --name nodetodoapp patilprashant10/nodo-todo-app-test:latest'
                sh '''
                ssh -i deployment.pem -o StrictHostKeyChecking=no ubuntu@3.80.24.188 <<EOF
                sudo docker login -u patilprashant10 -p dckr_pat_WSdI97yEEw0n90icDyZ4vlmEPqY
                sudo docker pull patilprashant10/nodo-todo-app-test:latest
                sudo docker stop nodetodoapp || true
                sudo docker rm nodetodoapp || true
                sudo docker run -d --name nodetodoapp patilprashant10/nodo-todo-app-test:latest
                '''
            }
        }
    }
}
Final pipeline script
pipeline {
    agent { label 'Dev-Agent node' }

    stages{
        stage('Checkout'){
            steps{
                git url: 'https://github.com/patilprashant10/nodejs-todo-app.git', branch: 'master'
            }
        }
        stage('Build'){
            steps{
                sh 'sudo docker build . -t patilprashant10/nodo-todo-app-test:latest'
            }
        }
        stage('Test image') {
            steps {
                echo 'testing...'
                sh 'sudo docker inspect --type=image patilprashant10/nodo-todo-app-test:latest '
            }
        }

        stage('Push'){
            steps{
                 sh "sudo docker login -u patilprashant10 -p dckr_pat_WSdI97yEEw0n90icDyZ4vlmEPqY"
                 sh 'sudo docker push patilprashant10/nodo-todo-app-test:latest'
            }
        }
        stage('Deploy'){
            steps{
                echo 'deploying on another server'
                sh 'sudo docker stop nodetodoapp || true'
                sh 'sudo docker rm nodetodoapp || true'
                sh 'sudo docker run -d --name nodetodoapp patilprashant10/nodo-todo-app-test:latest'
                sh '''
                ssh -i deployment.pem -o StrictHostKeyChecking=no ubuntu@3.80.24.188 <<EOF
                sudo docker login -u patilprashant10 -p dckr_pat_WSdI97yEEw0n90icDyZ4vlmEPqY
                sudo docker pull patilprashant10/nodo-todo-app-test:latest
                sudo docker stop nodetodoapp || true
                sudo docker rm nodetodoapp || true
                sudo docker run -d --name nodetodoapp patilprashant10/nodo-todo-app-test:latest
                '''
            }
        }
    }
}

· Click on Save and Apply


Finally! Our Nodo-todo-app-deployment pipeline successfully Checkout, built, Tested, Pushed and deployed.
Thanks For Reading! :)
- Prashant Patil